Avoiding Cones in iModeller 3D
This page shows how to avoid "cones" on top of objects.
Origin
"Cones" on objects are a common problem people encounter when using iModeller. They stem from the fact that iModeller does not have a silhouette which "cuts off" the specific part of the object.
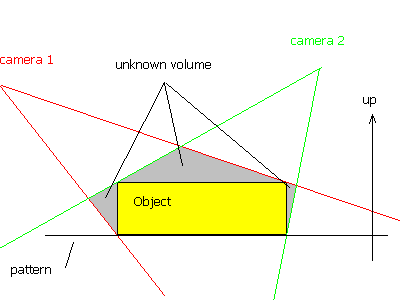
One can see this in above image - two cameras observe an object, but the silhouettes they get from the object don´t help determine
the object´s boundaries at all - one can see a cone already!
Solution
Since iModeller bases on silhouette cuts, it is important to capture the
relevant silhouettes - otherwise you end up with a hat. When you raise the object from the
ground, you end up with another ´hat´ on the downside.
You can easily create artificial views of the object when using the
´generate image´ button in the 3d view - generate an image and "unmask"
those parts that are not captured by any other image. Create
a view from the side of the object, then unmask the cone-top. iModeller then
recreates the shape without the cone.
As a practical solution, and especially if you have lots of objects to
scan, it might be wise to set up a static environment for your objects:
(see image below)
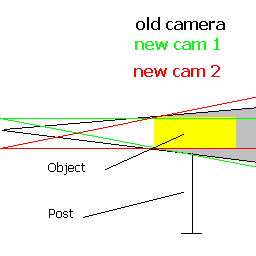
- place the object on a post. let the camera be about 2 times as far away
from the closest calibration point as the post is high.
- make sure that the camera position is not lower than thirty degrees with
respect to the center of the calibration pattern, and not higher than 60
degrees.
- you need two different heights for the camera tripod to capture both
flat tops, when the object is on a post.
- make sure that each position of the camera has one line of sight aligned
to the top or bottom of the object, respectively.
- This might seem a bit complicated, but it will help you to quickly
capture the objects you desire. Just imagine that the computer ´sees´ only
the silhouettes - it does not know about flat tops of e.g. cans. To tell the
computer of a flat top, make sure the silhouette it gets captures this
fact.
Please note that iModeller does not recreate ´depth´, i.e. it
cannot detect concavities. Therefore, any textured part of the object
which originally depicts a concave area (e.g. a top view of the spout
of a vase) must be distorted. To overcome this, take a picture
directly from above this area and use the ´Use for Texture´ mask on
the relevant area in this image.
|
